In Microsoft Dynamics CRM, we got a new feature of using Quick View Forms. This is a wonderful feature that provides us with the possibility to show related data directly on the form without navigating to another record. But the problem is, Quick View Form doesn’t fit into the primary form nicely! There are a lot of white spaces on the sides especially on Left and Top of the Quick View Form. But unfortunately, there is no out of the box way to do that. Placing a Quick View Form to look the same as other controls on the Main form is a headache for CRM developers because Microsoft does not provide support to maintain Margin or Padding inside the Form. To avoid that, I found a way using some CSS and JavaScript tricks to remove the unwanted spaces inside and around of Quick View Form.
Let's check out how to do that!
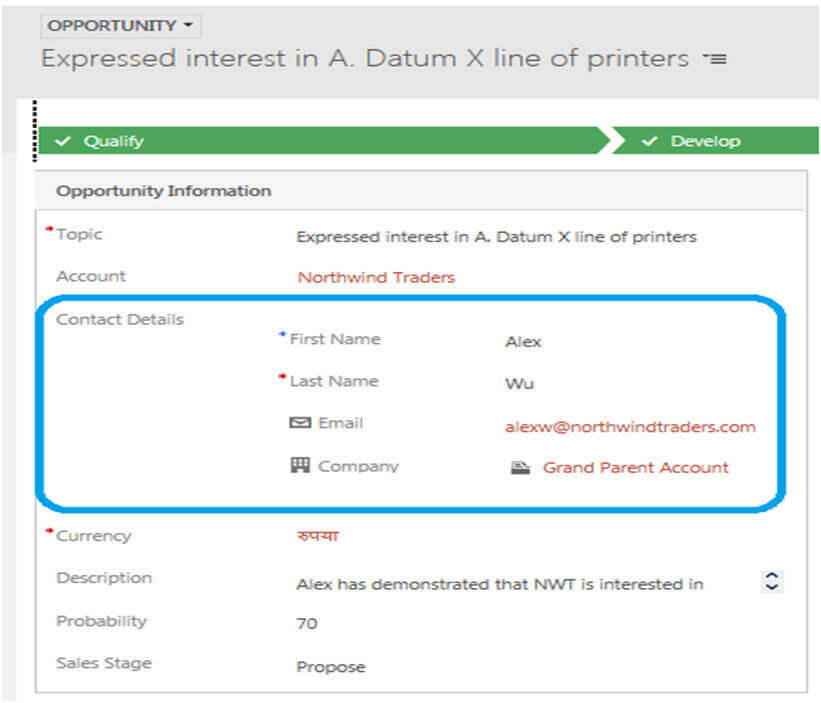
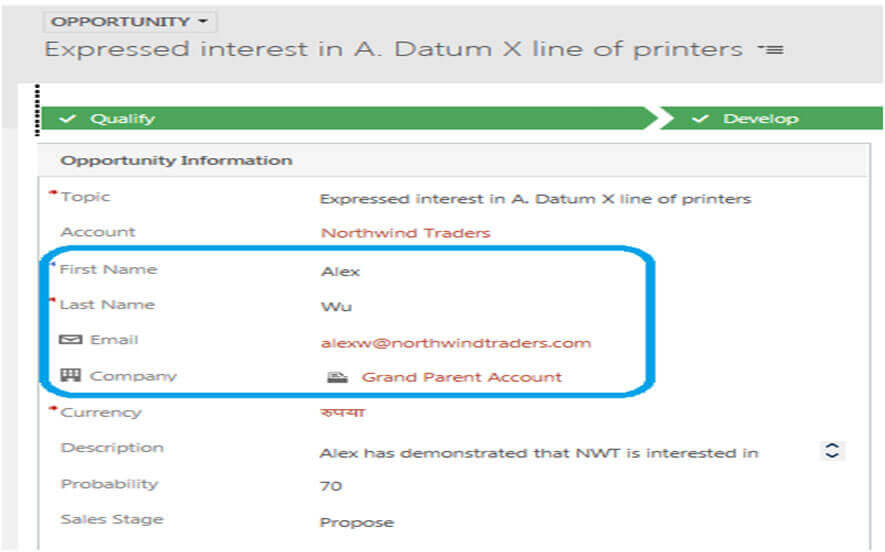
First of all, when you place any Quick View Form on the Main Form it will look like below Image. For this example, I have put Contact quick View form on Opportunity's Main display form. You can see the extra spaces around the labels and inside the Quick View form in the below Image. Now, as a developer, we need to get rid of it if the Client is not happy with this design.
The Good News is, it’s possible to hide this unnecessary space. But I must tell you, it’s not an out of the box supported customization in Dynamics 365 services. I have found this way after a lot of research on various blog sites. The way to get rid of these white spaces is to write custom CSS classes which will overwrite the default CRM CSS design to remove these white spaces and make the form cleaner in look. We need to use CRM web resources for CSS and JS to achieve the goal.
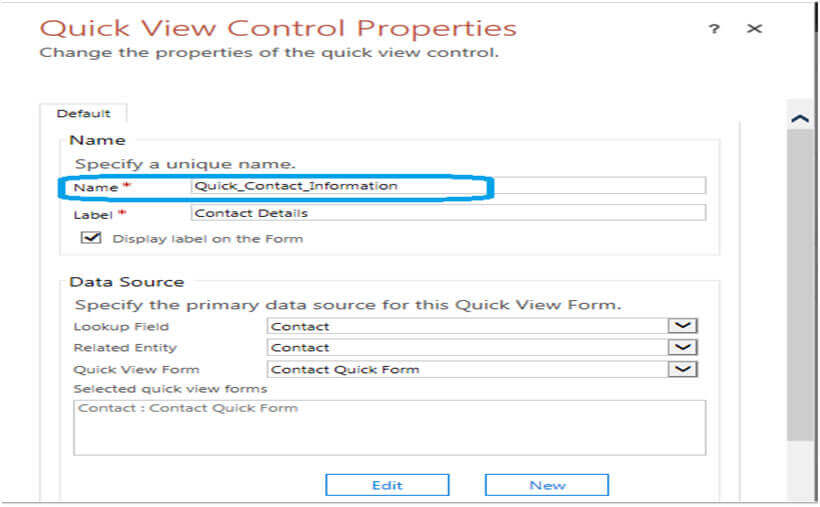
To start with, when you add a Quick View Form to your form, you need to give it a name. It doesn’t matter what you put into the field. It does, however, help if you put in something logical. For example, if you put a Quick View Form on the Opportunity form with the Contact Detail, you can use "Quick_Contact_Information", Show something like this.
Now, Next step is to create two Web Resources. This can be done from any form (Insert->Web Resources -> New
One CSS and one JavaScript (js). In the CSS file, we setup what we want to have as a layout change (get rid of the white space) and in the JavaScript we setup some code to tell Dynamics 365 to actually use our CSS instead of the default one so we can overwrite the design.
CSS code :
In this code, you need to replace "Quick_Contact_Information", with the name you gave the Quick View Form.
1. Give the Web Resource a name and Type (choose Style Sheet (CSS)):
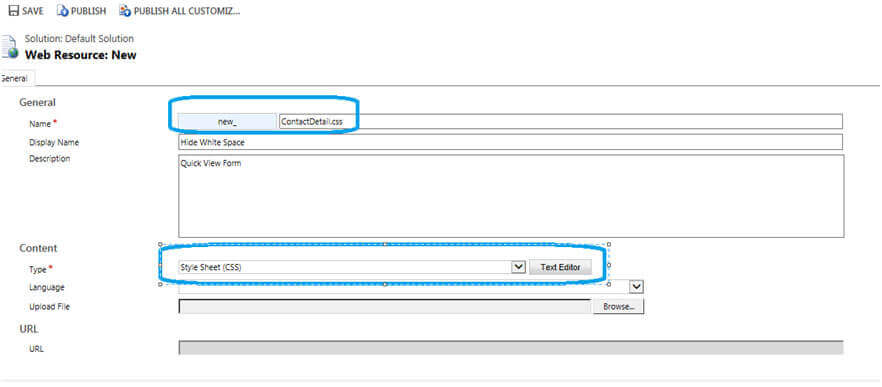
Click Text Editor next to Style Sheet (CSS) and include the below code and Save Web Resource. Please note that we are using the Name we mentioned while adding Quick View Form on the Main form. You can use your form name instead.
JavaScript code:-
2. Create a second Web Resource (JavaScript this time), Click Text Editor next to Script (jscript) and include the below code and Save Web Resource.
In this code, you need to replace “ContactDetail.css” with the name you gave the CSS WebResource.
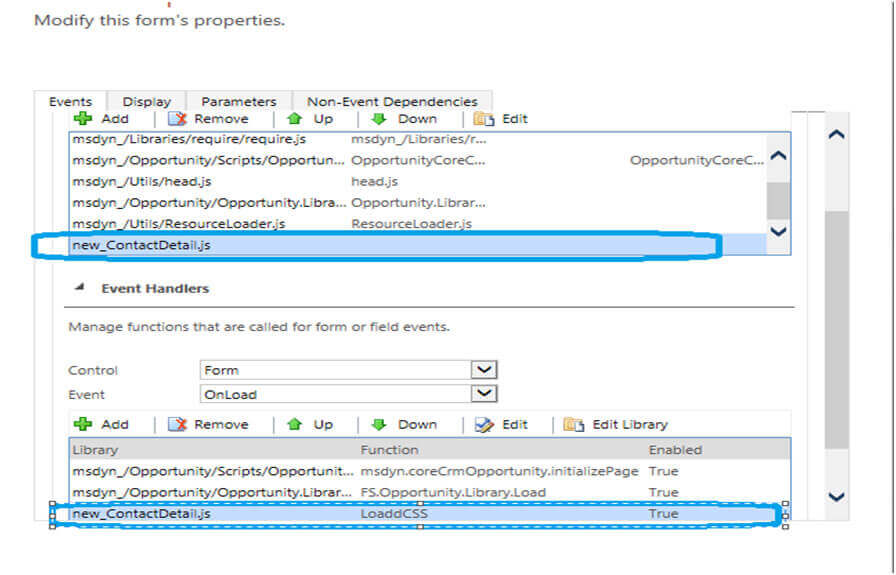
All you need to do now is add the JavaScript to the main form and call the function ‘LoadCSS’ at the on Load event. Click OK, save and publish.
Your Quick View Form is now perfectly in sync with all the other fields and sections without any an Additional white spaces. This will work like a Charm on your Main Form. Your Main Form will look like,
Wasn't it now look pretty cleaner and similar to normal Form fields ?? Well I think it does. So you can use this technique if your client it pursuing you to show quick view forms without unnecessary spaces around.
Good luck !!
This article is shared by the Aegis Software Canada Dynamics 365 CRM Services team, to help developers around the world.
For further information, mail us at info@aegissoftwares.com