Introduction to Spring Cloud Stream:
- Spring Cloud Stream makes dead symbol the work of publishing data from one node to another, of working with another down in terms, in terms of these message Queues or these message brokers. It makes a matter of convention and configuration the connection between these two different services or these different nodes. Let's see it in real-time implementation example:
Spring Cloud Dataflow Implementation using Rabbit MQ Binder:
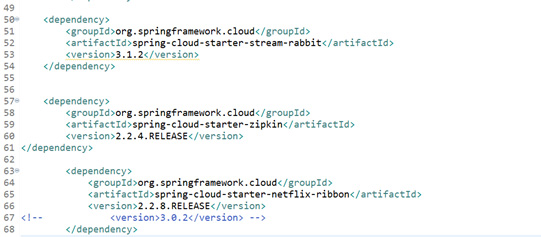
- I have added these below two dependencies in the project POM xml file. And I am going to bring in Spring Cloud Starter Stream Rabbit MQ. Now mind you, there are other binder implementations. This is the one for Rabbit MQ. I've got Rabbit MQ, a message broker, running on my local machine. You could use Apache Kafka, you could use Redis, but, for our purposes, Rabbit MQ will be just fine.
- To make this work, I need to define a channel. Now, in Spring Framework, a message channel is a named conduit. It's a logical pipe through which data is passed, and it is the basis for the Spring Framework WebSocket Abstraction in Spring MVC. It's also used quite extensively inside Spring Integration as a way of building event-driven systems. You stage the rights from one system to another through these queues. Java development services company build complex solutions by composing components and then staging the results of those components, the work of those components, into these queues, these channels.
- We can also use channels to sort-of act as a logical proxy for a downstream service. And that's what I am going to explain and show you here with example implementation details. We're going to declaratively define a channel here. We're going to call it the CommunicationChannels, and we'll say that this is going to be an output channel, so it's going to send data out. We're going to call the output channel output.
- Now again, this name is completely arbitrary. We can have as many channels as we want. First of all, I can say orders, and I can say customers, and so on. But, more to the point, this name is arbitrary as It's up to you. And I've only got one downstream service, so that works fine for me. I'm going to use @enableBinding annotation, in the CommunicationChannels

- It is going to activate the Spring Cloud Stream binding. Now let me mention how the configuration for this works? Now we just need to know that this is an object called the CommunicationChannels, which in turn defines another bean called the output channel. We can inject both this object and the nested channel definition. If I want to just de-reference any of my channels, you can just inject the outer interface type. Spring will give us a bean that implements that type that provides references or valid pointers to this channel.
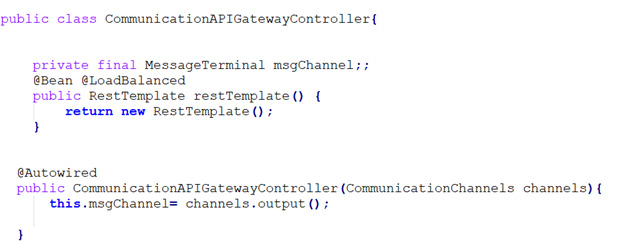
- So, let me implement that here. In the message channel out, I'll inject it. I'll just de-reference it from the interface here. We can initialize this with the help of parameterized constructor. Now, in your code, we can create a Spring Framework message like “Aegis message” here is going to be the reservation name. We can write the name that we've received in the post to the downstream service and then have it written to the database. And then We are going to send the resulting message on the output channel like this.
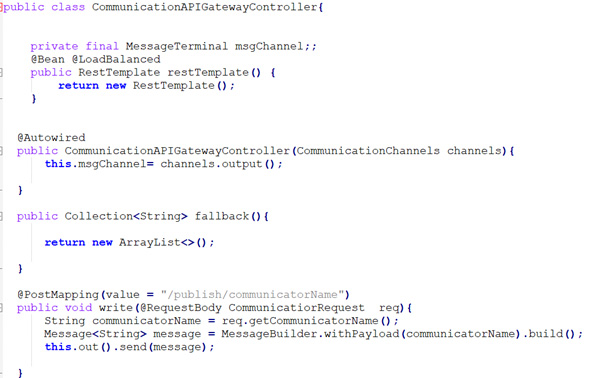
- Here in the above snipper, I have written logic for simple writing to my downstream service. It's not too bad, it's three lines of code, so we get the result. Now we need to do the same thing on the other side. We need to do the same thing on the CommunicationService, the consumer of the write. Let's go ahead and bring the same rabbit MQ dependencies as well for the service here. And now we have to do the same thing in reverse.
- So, we have to use @ enableBinding, annotation as the same already we did for other services. And we need to define another interface. I'm going to say CommunicationChannels, and again the name for the interface is opportune, So, here I'm going to define a channel called InputChannel And we have to enableBinding here. We'll say that this is going to be the binding that we want to allow. And now, I want to take the data coming in from the message. We could have to use the Spring Innovation Component Model.
- We can add the component class CommunicationProcessor, and we have to use the annotation @messageEndpoint then accept new reservations as a message here. And it tells Spring Integration that when a message comes in on the input channel, I want to accept it and have it delivered to this method. Wherein, of course, we can inject the reservation repository, the JPA Repository here, and then use that to write the code to the database.

- So, we can use save() method, and then we can get the incoming message payload from getPayload(). Now we can send a write to the downstream service.
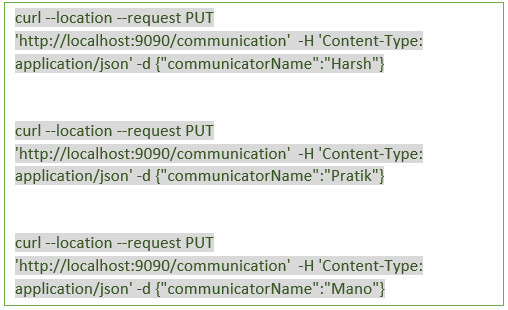
- You can test the application using curl command with -H stands for header and in header we have to pass content type as application json and url will be http://localhost:9090/communication. So, I'm sending a put request with empty JSON for the communication like so, and I'm going to send a few of communicator names in the body with the -d parameter.

- So, here you can see everything's working just fine. So here, both the producer and consumer are live and hence everything's fine. This is all the happy path scenario that I just explained. I can prove that everything's working by going to my communication service here and killing it. And the moment we stop this service, we will be getting the exception that Zipkin is creating, that our Spring Cloud Starter Zipkin is creating, because it's not able to talk to a server.
- Here, we're going to fix that now. It doesn't break the exception, it's just useful to know. So now once we kill the communication service, we have to trigger 2-3 curl commands with post requests. So, by stopping the communication service, those old communicators' names will be gone now. But here nothing to worry about this as there'll be a new communicator name
- So, in the meantime, we can trigger multiple post commands with new communicator names as below:
- Now, we are going to re-start the reservation service. But remember what happens when we start the application, we have those 3 records. And what we're going to see reflected is that those 3 records are going to be re-created as this is an in-memory embedded database, so all the data gets discarded on every re-start. But we're going to see delivered those three records, those three good communicator names, along with those other names. And we'll see those reflected in the console as the application spins up.
Spring cloud Data Flow UI Configuration:
The installation of spring cloud dataflow you can do on your local Windows machine and I have demonstrated through this blog that how you can run a task or stream or a spring patch job on spring cloud dataflow server. So, I will go first to the spring cloud dataflow getting started guide and follow the installation i.e., local installation. You can do it programmatically using the Spring project by adding the dataflow maven dependencies and alternatively you can choose the manual installation. I have explained both ways.
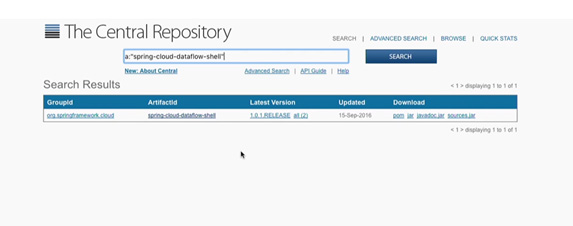
- There are some binaries that you need to download. In my local, I have already downloaded these binaries onto my local machine for convenience.
Spring Cloud Data Flow Local Server Setup
⮚ Below two jars you have to download from internet:

- I have also put the commands to start teaching our processes for skipper server and dataflow server as a Windows command file so which I have saved and once we click on this the two processes would start so these keep our server is necessary for the actual deployment of various tasks and jobs.


- Dataflow server just coordinates using spring skipper server, after executing the binaries, just wait till these servers get started and once the server gets started you can see the dashboard at localhost 9393 port(http://localhost:9393/dashboard). The dashboard of Spring cloud dataflow will look like below and you can see various menu items everything here needs to be registered as an application and there are different ways in which you can add an application. You can also do a bulk import so there are some predefined apps and stream apps that are there, and you can import one of the tasks apps.
Task Creation and Execution on Spring Dataflow UI
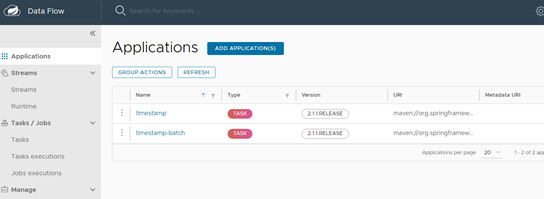
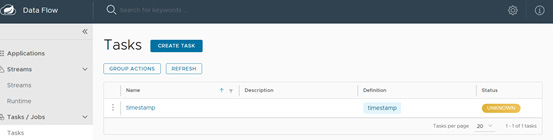
- So here in the above, you can see that several sample task apps can be configured here and before creating a task, first go to the application menu on the left and then go to the import application field. After that, it will show you several applications that are already configured in the dashboard. Just import one of the applications. In my example I have imported one task application for maven as shown below:
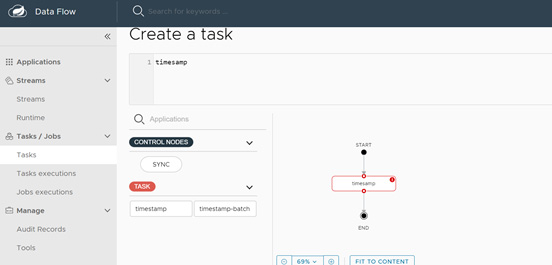
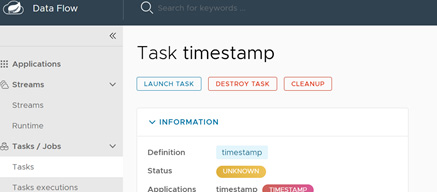
- Then create a task using one of those apps and you can take time stamp that I have created a time stamp and we create a task we just give it a name time stamp and you can see that this timestamp task is created, and we can now launch this, and we can supply some parameter values and after you click on create task button it will create our timestamp task and we have successfully launched the time stamp now.
- For launching the task, you have to click on that task and then in the next window you will get the launch task option like below:
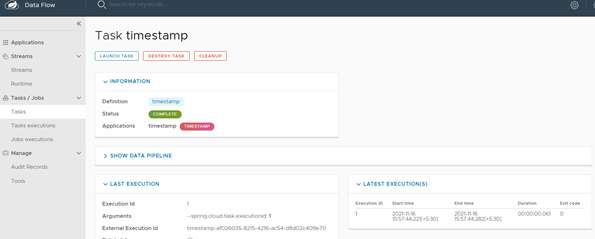
- After launching the task, you can go to the executions and see that what has happened to this we can also see the logs here as shown in the below screenshot that the task is completed, and it has printed a task or the time stamp so you can see that how simply it executed one task the task is shown complete :
- You can also create a job spring job as a task and then you can simply now add this as our task item you just need to provide the name of the job of the task and create a task give it a name again time stamp batch and create a task the task got created we can now launch it just wait till it gets completed okay
How to Orchestrate streams programmatically with Spring Cloud Dataflow:
- Spring Cloud Stream-based messaging-based microservice. I have built a service that accepts data across a commodity transport, AMQP, and it wouldn't be hard to build a more interesting, more sophisticated solution by staging the processing that happens before that message arrives in the communication service through the Spring Cloud stream destination.
- If you really think how easy it is to compose a sophisticated solution by chaining things together in the command line. For example:
cat input.txt | grep inputMsg| wc -l > output.txt
- And then redirect it out to output.txt. Here just understand one thing what we're trying to do here. We can take one focused service, like wc, and the grep operator, and cat, and compose them together to build something more sophisticated. The same is true for messaging-based microservices. We can take them and stitch them together to create a stream processing solution.
- This gives us a lot of power because now we can take singly focused reasonable microservices, compose them and have them process data as fast as we need them to, buffered of course by a Spring Cloud Stream binder, like RabbitMQ or Apache Kafka, for example.
Use case Implementation:
- Spring Cloud Data Flow is a mechanism to build Stream processing solutions and to orchestrate distributed processing across a cluster fabric, a computing fabric, like Mesos or YARN or Cloud Foundry. Let’s create a fresh new project from spring.io and we are going to build a Data Flow service. We'll build in the local Data Flow server. Now there are other implementations of the Data Flow server. You can use the one for Cloud Foundry or Mesos or YARN or Kubernetes. But I have explained in this blog other implementations of Data Flow where I am going to run on my local machine.
- I am going to use the dependencies of Spring Cloud configuration support and then I have used Eureka service registry and discovery support. So, with these dependencies I have generated a new service. And the service is just a rest API and we can interact with a rest API through the rest API directly if we want.
- In the properties file, I have used the application name dataflow-service-demo. And have added the cloud-config URL where my config server runs
spring.cloud.config.uri = http://localhost: 8888.
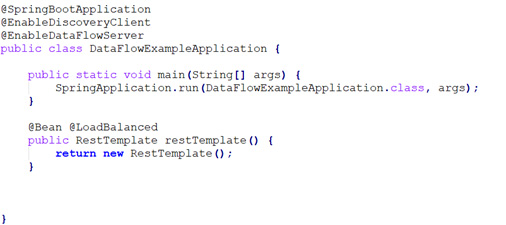
- And we need to rename this property file to be bootstrap.properties. Now let’s go to the Data Flow service application and in the application main class, we have to use @enableDataFlowServer. And I have also used @EnableDiscoveryClient. And I am going to spin this up.
- As I say, this is going to be a service that will spin up and respond to requests via the rest API. It can store its state, if you want, in a single place. But, for now, it's going to run within the local in-memory embedded database, so it's easy to get started and try something out. And here we can see that it's spun up on port 9393, which is the default.
- We could create our own shell if we wanted to, using the start.spring.io. I'm not sure if that's really valuable, you can instead, download the shell online. It's online. It's just a Maven dependency. Here it is. Here's 1.01 release. You can download that shell in the jar. Or I will just use the one that we already got. I've got it on my machine here.
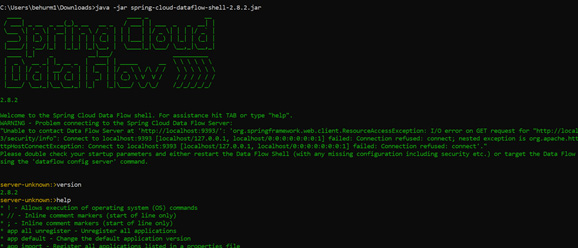
- Copy shell here to any location. And then open the command prompt and run the “java -jar shell.jar”. And it's going to connect to the Data Flow server.
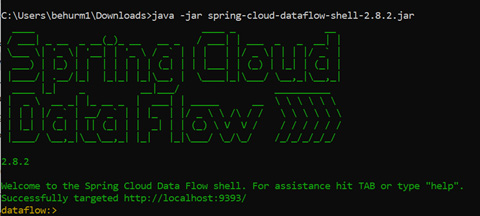
- I can hit the tab to make you understand what's possible. I can hit runtime and show the apps, for example. There's nothing there right now. I can show the version of the Data Flow shell versus the server. It's a little bit out of date. Show help to see there are all the commands that we can use.
How to create a stream in Spring Cloud Dataflow
- But what I want to do here that let’s create a stream based on some small singly focused apps. And I will be reusing that communication service that we created earlier. Rather I want to be able to send data from another source to the same communication service destination. I will be importing some modules. Because if you run the “app list” command in the cmd line then we will see no apps registered. So instead, I have imported using the app import command.

- A bunch of prebuilt Maven coordinates that Spring Cloud Data Flow can use to build complex streams. Now applications will get imported and they're available in my so-called toolbox if you will. A source in Spring Cloud Data Flow is a Spring Cloud Stream module that sends a request, a message, on a well-known channel called output. A processor is a Spring Cloud Data Flow module that accepts a message on a well-known channel called input and it sends that message on a well-known channel called output.
- A sink is a Spring Cloud Stream module that accepts a message on a well-known channel called input. And we have no tasks right now, but tasks refer to long-running processes like those that you would do with String Batch, for example. Or anything that implements a command-line runner in an application context could also be a task.
- Anything that has a finite start and stops time, right? Whereas with a stream, which is what I have explained here they exist forever. It's just an integration of components that will process data as long as the sun is in the sky.
- Here is my project, I want to take all the communicator names in those files and then send them to the communication service. So instead of sending a post through my edge service, I'm going to monitor a directory. And then if there's a new file, It will automatically take all those names and send it to a communication service as well. I can do this because Spring Cloud Stream is being used in both places.
- Let's build a stream. We'll call this stream files to reservations. And the definition is going to use the file source, which is just a Spring Boot application that is using Spring Cloud Stream that produces messages on the output channel. We're going to execute the below command and send it to the communication destination. This is exactly the same destination that we had in our earlier Spring Cloud Stream bindings that live in RabbitMQ.

- As I am using RabbitMQ based Data Flow modules, then everything will work because they're both pointing to the same RabbitMQ. Here we go. Deploy that. And that's going actually start an instance of this Java source.
- We can see that reflected here in the Data Flow service application console. We can see the new communicator values there. The Spring Cloud Stream module, which is, in turn, using Spring Integration to monitor the directory, has seen the new value.
Spring Cloud Data Flow Task Execution Programmatically:
- I will explain to you how the spring cloud data flow enables task execution. Let’s go to our spring boot main class where we have to add @EnableTask annotation. This annotation tells the spring cloud task to bootstrap its functionality and by default, it imports an additional configuration class i.e., simple task auto configuration. In this class, spring internally creates a task repository bean where TaskRepository is the interface, and it contains the implementation of a simple task repository.
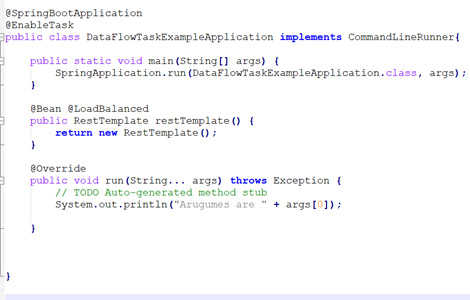
- In this SimpleTaskReository class, you will find couple of methods that are completeTaskExecution() and createTaskExecution(). Basically, we are using these 2 methods for updating the task details to the database.
- Now, how you can store the task histories to the database means how you can integrate with the DB. If you want to customize your log statements or if you want to trace some useful information like before method call or after the method call, then you have to use Task execution Listener. So, in our main class, I have implemented the CommandLineRunner interface as well as TaskExecutionListener and after that, we have to override the three methods like onTaskStartUp(), onTaskEnd() and onTaskFailed(). You can add some print statements in all these 3 methods to track the task information.
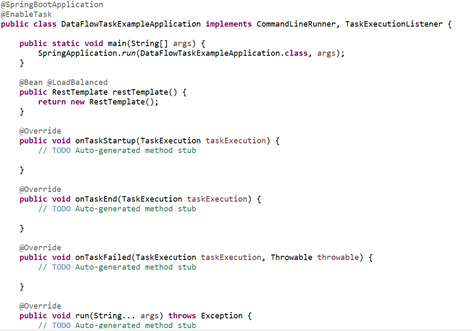
- If we spin our application, then you can verify all your logs in the console. The different fields in the task execution can be printed also in the log file.
Saving task execution in the Oracle DB:
- Here, we must create our database connection using data source properties. In our database, we have to execute the first query statement as create database = SpringcloudExampleTask. And then the next statement would be using that database, hence write like “use SpringcloudExampleTask”.
- So, here we just created a schema, and we will be using the same schema. In application.properties, we have to add all the data source-related properties for creating the connection string. Then in the application pom file, add required spring data JPA dependencies and ojdbc dependency as well.
- So, once you run your applications, you can see that 5 extra tables will get created in your database. The table names are -> task_execution, task_execution_params, task_look, task_seq, task_task_batch. In these tables you will get all the task information like start time, end time and last updated time, etc. task_execution_params table will contain all the run time arguments that you pass from your application
FAQs:
Subject: Processing and Deploying Streams programmatically with Spring Cloud Dataflow in Java Applications:
What is Spring Cloud Dataflow?
Ans: Spring Cloud Data Flow is a cloud-native data framework that combines stream and batch processing for data micro services on-premises or in the cloud. Spring Cloud Data Flow is a set of tools for building complicated data pipeline topologies for streaming and batch data. It's a set of tools for creating real-time data integration and processing.
How to implement Spring Cloud Stream's RabbitMQ binder?
Ans: In Spring Framework, a message channel is a named conduit. It's a logical pipe through which data is passed, and it is the basis for the Spring Framework WebSocket Abstraction in Spring MVC. It's also used quite extensively inside Spring Integration as a way of building event-driven systems. use @enableBinding annotation. In this blog, I have explained the code to send the resulting message on the output channel. Please refer to this blog for more details.
How can you create an Execute Task on Spring Dataflow local server?
Ans: For this, you have to first run the dataflow server in your local machine by running the 2 jars that are spring-cloud-dataflow-server and spring-cloud-skipper-server. Then the dataflow UI, you can see various menu items everything here needs to be registered as an application and there are different ways in which you can add an application. You can also do a bulk import so there are some predefined apps and stream apps that are there. I have clearly mentioned all the steps in this blog for task creation and execution.
How to create, Orchestrate and deploy a stream in Spring Cloud Dataflow?
Ans: Spring Cloud Stream-based messaging-based microservice. I have built a service in this blog that accepts data across a commodity transport, AMQP, and in my code, I have created a more sophisticated solution by staging the processing that happens before that message arrives in the communication service through the Spring Cloud stream destination. Spring Cloud Data Flow is a mechanism to build Stream processing solutions and to orchestrate distributed processing across a cluster fabric. You have to use @enableDataFlowServer and you can use @EnableDiscoveryClient for Eureka config. Please refer to this blog for complete use case implementations.
What are the various ways of Task Execution in Spring Cloud Data Flow Programmatically?
Ans: You have to use @EnableTask annotation that tells the spring cloud task to bootstrap its functionality and by default, it imports an additional configuration class i.e., simple task auto configuration. Spring internally creates a task repository bean where TaskRepository is the interface, and it contains the implementation of a simple task repository. Please refer to this blog for more details.